Share
In this blog post
This is the final part in a series on P5.js (from here 'P5') - a creative coding library that makes working with the Canvas API much easier. In part one, we covered how to draw elements on the screen and react to keyboard and mouse input. We learned how to create common game features in part two - collision detection, entity management, and state management.
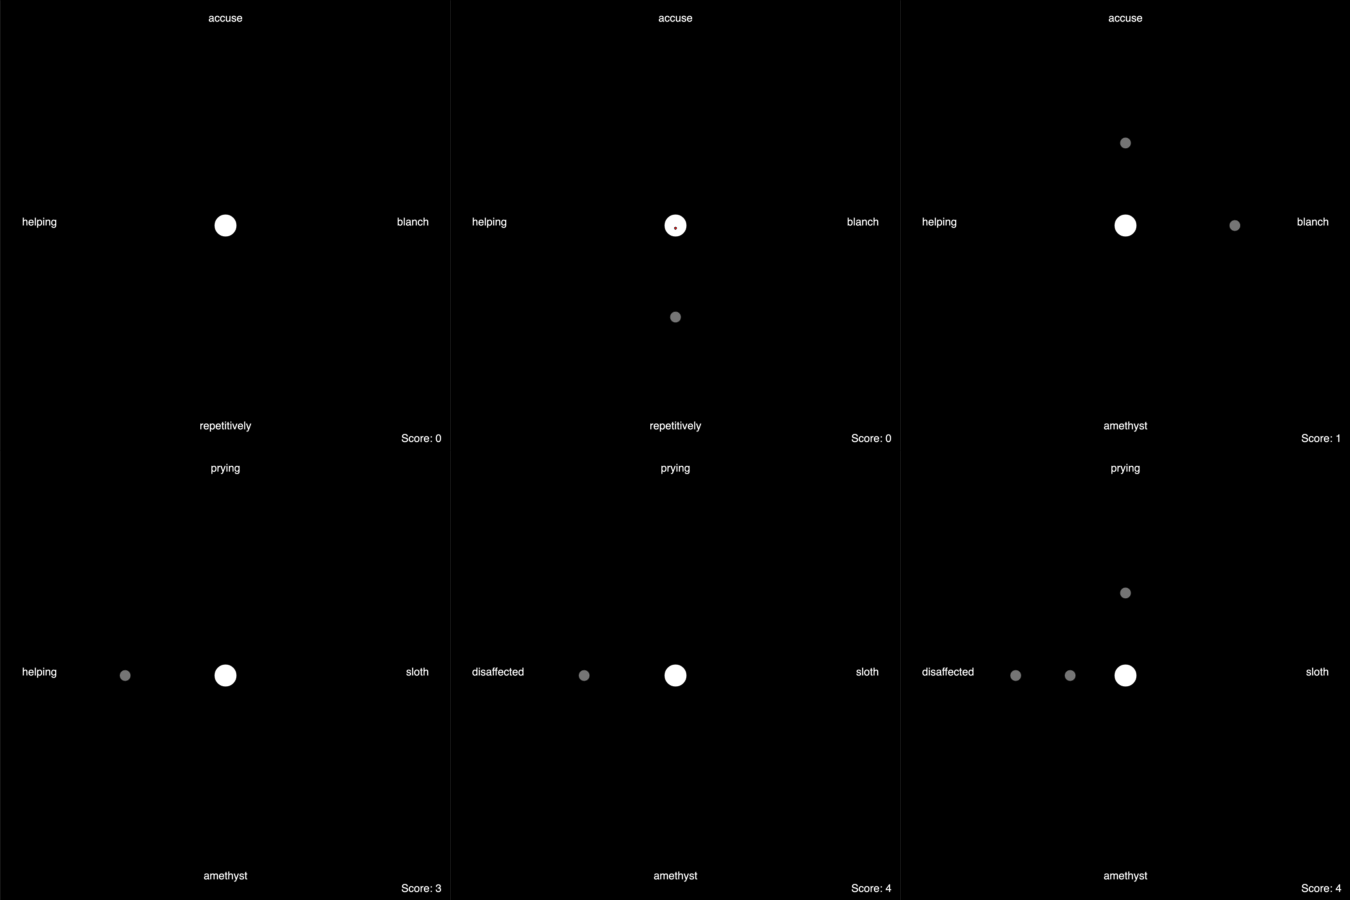
In today's tutorial, we'll bring together everything we know to create a voice-controlled game - try the game out now. A new enemy appears coming from one of four directions and begins moving towards you every few seconds. Each direction has a random word associated with it, and if said correctly, a bullet will fly in that direction. If an enemy reaches you, the game is over.
The final code for today's project can be found on GitHub.
Before We Start
You will need a Deepgram API Key - get one here.
Setting Up State
On your computer, create a new directory and open it in your code editor. Create an index.html file and add the following to it:
<!DOCTYPE html>
<html>
  <head></head>
  <body>
    <script src="https://cdn.jsdelivr.net/npm/p5@1.4.1/lib/p5.js"></script>
    <script>
      // Global Variable Section Starts
      let playerSize = 50
      let score = 0
      let gameOver = false
      // Global Variable Section Ends

      function setup() {
        createCanvas(1000, 1000)
        frameRate(30)
      }

      function draw() {
        background('black')
        translate(width / 2, height / 2)

        fill('white')
        textSize(24)
        textAlign(RIGHT)
        text(`Score: ${score}`, width / 2 - 20, height / 2 - 20)

        if (!gameOver) {
          fill('white')
          circle(0, 0, playerSize)

          // Game logic goes here
        } else {
          fill('white')
          textSize(36)
          textAlign(CENTER)
          text(`Game over! Score: ${score}`, 0, 0)
        }
      }
    </script>
  </body>
</html>
In the second post in this series, you learned how to keep score and show a game over screen - we are using both approaches here.
The only new thing here is translate(width/2, height/2), which moves the origin (0, 0) to the center of the canvas. This means the top-left is now (-500, -500), and the bottom-right is (500, 500). It makes sense to do this when entities often need to refer to the center position.
Create Enemies
At the bottom of your <script>, create a new Enemy class:
class Enemy {
  constructor(direction, distance) {
    this.direction = direction
    this.size = 25
    this.x = 0
    this.y = 0

    if (this.direction == 'UP') this.y = -Math.abs(distance)
    if (this.direction == 'RIGHT') this.x = distance
    if (this.direction == 'DOWN') this.y = distance
    if (this.direction == 'LEFT') this.x = -Math.abs(distance)
  }

  move() {
    if (this.direction == 'UP') this.y++
    if (this.direction == 'RIGHT') this.x--
    if (this.direction == 'DOWN') this.y--
    if (this.direction == 'LEFT') this.x++
  }

  touchedPlayer() {
    const d = dist(this.x, this.y, 0, 0)
    if (d < playerSize / 2 + this.size / 2) gameOver = true
  }

  display() {
    fill('gray')
    ellipse(this.x, this.y, this.size)
  }
}
When an instance is created, you must provide two arguments - direction - one of 'UP', 'DOWN', 'LEFT', or 'RIGHT', and distance - which dictates how far away from the center point the enemy should spawn.
In the constructor, the enemies are initially placed, and in move() they move one pixel closer to the center. touchedPlayer() uses collision detection -- we learned about that last week -- to set gameOver to true if an enemy touches the player in the center of the canvas. Finally, the enemy is drawn at its new (x, y) position.
In your global variable section, add these line:
let directions = ['UP', 'DOWN', 'LEFT', 'RIGHT']
let enemies = []
At the bottom of your setup() function, begin spawning enemies randomly every 2-5 seconds:
setInterval(() => {
  enemies.push(new Enemy(random(directions), width / 4, width / 2))
}, random(2000, 5000))
The first argument will be randomly chosen from the directions array you just created. The final step is to loop through all existing enemies and run their methods in draw(). In your game logic section, add this code:
for (let enemy of enemies) {
  enemy.move()
  enemy.touchedPlayer()
  enemy.display()
}
Open index.html in your browser, and it should look like this:

Create Bullets
Currently, there's no way to defend yourself. When a player presses their arrow keys, a new bullet will be created in that direction.
At the bottom of your <script>, create a new Bullet class. It should look familiar as it works largely the same as the Enemy class:
class Bullet {
  constructor(direction) {
    this.direction = direction
    this.size = 5
    this.speed = 6
    this.x = 0
    this.y = 0
    this.spent = false
  }

  move() {
    if (this.direction == 'UP') this.y -= this.speed
    if (this.direction == 'RIGHT') this.x += this.speed
    if (this.direction == 'DOWN') this.y += this.speed
    if (this.direction == 'LEFT') this.x -= this.speed
  }

  touchedEnemy() {
    for (let enemy of enemies) {
      const d = dist(enemy.x, enemy.y, this.x, this.y)
      if (d < this.size / 2 + enemy.size / 2) {
        enemies = enemies.filter((e) => e != enemy)
        this.spent = true
        score++
      }
    }
  }

  display() {
    fill('red')
    ellipse(this.x, this.y, this.size)
  }
}
If an enemy is hit, it is removed from the enemies array, and the bullet's this.spent value becomes true. In the global variable section, add a new array for bullets:
let bullets = []Underneath our enemies loop in draw(), add a loop for bullets:
for (let bullet of bullets) {
  if (!bullet.spent) {
    bullet.move()
    bullet.touchedEnemy()
    bullet.display()
  }
}
If the bullet has been spent, it won't be shown or run its collision detection logic. This means a bullet can only successfully hit an enemy once.
So far, you have used the P5 preload(), setup(), and draw() functions, but there are a host more that are triggered based on user input.
Unlike the keyIsPressed variable which is true every frame that a key is pressed, the built-in keyPressed() function is triggered only once when a user presses a key on their keyboard. In order to trigger the function twice, two distinct presses need to be made - much better for bullet firing. After you end the draw() function, add this:
function keyPressed() {
  if (key == 'ArrowLeft') bullets.push(new Bullet('LEFT'))
  if (key == 'ArrowRight') bullets.push(new Bullet('RIGHT'))
  if (key == 'ArrowUp') bullets.push(new Bullet('UP'))
  if (key == 'ArrowDown') bullets.push(new Bullet('DOWN'))
}
That's the core game finished. Here's how it looks (recording is sped up):

Add Word Prompts
Create a new file called words.js, and copy and paste the content from this file on GitHub. This is a slight reformatting of the repository of over 42,000 English words.
As a note, this is a pretty long word list and includes some pretty long and complex words. You may want to experiment with the word selection you use to alter the difficulty.
Just before the <script> tag with our P5 logic, include the words.js file:
<script src="words.js"></script>Then, in your main <script> tag with our P5 logic, add the following:
function getRandomWord() {
  return words[Math.floor(Math.random() * 42812)]
}
This function gets one word at random and returns the string. You can add it anywhere, but I tend to add these utility functions to the very bottom of my <script>.
In your global variable section, store four random words:
let currentWords = {
  UP: getRandomWord(),
  DOWN: getRandomWord(),
  LEFT: getRandomWord(),
  RIGHT: getRandomWord(),
}
Just after your bullet loop in the game logic section, draw the four random words to the canvas:
fill('white')
textSize(24)
textAlign(CENTER)
text(currentWords.UP, 0, -height / 2 + 48)
text(currentWords.DOWN, 0, height / 2 - 48)
textAlign(RIGHT)
text(currentWords.RIGHT, width / 2 - 48, 0)
textAlign(LEFT)
text(currentWords.LEFT, -width / 2 + 48, 0)
Finally, in the Bullet.touchedEnemy() function, where we increment the score, replace a word when an enemy is hit:
currentWords[enemy.direction] = getRandomWord()
Shoot Bullets With Your Voice
It's time to create bullets with your voice! A persistent WebSocket connection will be made with Deepgram, allowing Deepgram to constantly listen to your mic to hear what you say.
This part of the tutorial will assume you know how to do live browser transcription with Deepgram. If not, we have a written and video tutorial available that explains every step in more detail.
In your global variable section, create one final value so we can display to the user what was heard:
let heard = ''At the very bottom of your <script>, add this:
navigator.mediaDevices.getUserMedia({ audio: true }).then((stream) => {
  const mediaRecorder = new MediaRecorder(stream)
  const socket = new WebSocket('wss://api.deepgram.com/v1/listen', [
    'token',
    'YOUR-DEEPGRAM-API-KEY',
  ])

  socket.onopen = () => {
    mediaRecorder.addEventListener('dataavailable', async (event) => {
      if (event.data.size > 0 && socket.readyState == 1) socket.send(event.data)
    })
    mediaRecorder.start(1000)
  }

  socket.onmessage = (message) => {
    const received = JSON.parse(message.data)
    const transcript = received.channel.alternatives[0].transcript
    if (transcript && received.is_final) {
      heard = transcript
      for (let direction in currentWords) {
        if (transcript.includes(currentWords[direction])) {
          bullets.push(new Bullet(direction))
        }
      }
    }
  }
})
Remember to provide your Deepgram API Key when creating the socket. At the bottom of this code, a check determines whether any of the directional words were heard and, if so, creates a bullet in that direction.
Finally, show the user what was heard just under all of the text() statements in draw():
fill('green')
if(`heard) text(`We heard "${heard}"`, -width/2+20, height/2-20)`
In Summary
The fact it was so little code to integrate voice control into this game should be a testament to how easy Deepgram's Speech Recognition API is to use.
Once again, a live version of the game can be found here and the final codebase on GitHub.
If you want to deploy your own, I encourage you to also read how to protect your API Key when doing live transcription directly in your browser.
If you have any questions, please feel free to reach out to us on Twitter at @DeepgramDevs.
If you have any feedback about this post, or anything else around Deepgram, we'd love to hear from you. Please let us know in our GitHub discussions .
More with these tags:
Share your feedback
Was this article useful or interesting to you?
Thank you!
We appreciate your response.


